Company Information
Ask for more detail from the seller
Contact Supplier
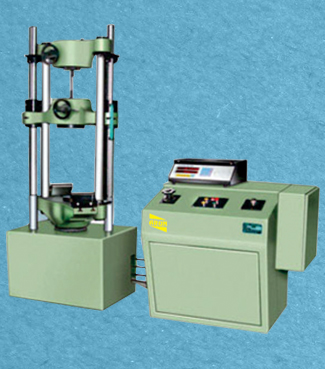
| MODEL | - | AI-UTES-10 | AI-UTES-20 | AI-UTES-40 | AI-UTES-60 | AI-UTES-100 |
| Maximum capacity | kN | 100 | 200 | 400 | 600 | 1000 |
| 1st Measuring Range | kN | 0-100 | 0-200 | 0-400 | 0-600 | 0-1000 |
| Minimum Graduations | kN | 0.2 | 0.4 | 1 | 1 | 2 |
| 2nd Measuring Range | kN | 0.50 | 0-100 | 0-200 | 0-300 | 0-500 |
| Minimum Graduations | kN | 0.1 | 0.2 | 0.5 | 0.5 | 1 |
| 3rd Measuring Range | kN | 0.25 | 0-50 | 0-100 | 0-120 | 0-250 |
| Minimum Graduations | kN | 0.05 | 0.1 | 0.25 | 0.2 | 0.5 |
| 4th Measuring Range | kN | 0.10 | 0-20 | 0-40 | 0-60 | 0-100 |
| Minimum Graduations | kN | 0.02 | 0.04 | 0.1 | 0.1 | 0.2 |
| Clearance for tensile at fully descended working piston | mm | 50-700 | 50-700 | 50-700 | 50-800 | 50-850 |
| Clearance for compression test at fully descended working piston | mm | 0-700 | 0-700 | 0-700 | 0-800 | 0-850 |
| Clearance between columns | mm | 500 | 500 | 500 | 600 | 750 |
| Ram stroke | mm | 150 | 200 | 200 | 250 | 250 |
| Straining/piston speeds (at no load) | mm/min | 0-300 | 0-150 | 0-150 | 0-100 | 0-80 |
| CONNECTED LOAD | - | - | - | - | - | - |
| HP | - | 1.3 | 1.3 | 2.3 | 2.5 | 3.5 |
| V | - | 400-440 | 400-440 | 400-440 | 400-440 | 400-440 |
| ø | - | 3 | 3 | 3 | 3 | 3 |
| DIMENSIONS | - | - | - | - | - | - |
| L X W X H (approx.) | mm | 2032 x 750 x 1960 x | 2032 x 750 x 1960 x | 2060 x 750 x 2180 x | 2065 x 750 x 2534 x | 2415 x 815 x 2900 x |
| Weight approx. | kg | 1500 | 1500 | 2500 | 3500 | 5500 |
| STANDARD ACCESSORIES | - | - | - | - | - | - |
| FOR TENSION TEST | - | - | - | - | - | - |
| Clamping jaws for flat specimens diameter | mm | 10-20 20-30 | 10-20 20-30 | 10-25 25-40 | 10-25 25-40 40-55 | 10-25 25-45 45-70 |
| Clamping jaws for flat specimens thickness width | mm | 0-10 10-20 50 | 0-10 10-20 50 | 0-15 15-30 65 | 0-15 15-30 70 | 0-22 22-44 44-65 70 |
| FOE COMPRESSION TEST | mm | - | - | - | - | - |
| Pair of compression plates of diameter | mm | 120 | 120 | 120 | 120 | 160 |
| FOR TRANSVERSE TEST | mm | - | - | - | - | - |
| Table with adjustable rollers width of rollers | mm | 160 | 160 | 160 | 160 | 160 |
| Diameter of rollers | mm | 30 | 30 | 30 | 50 | 50 |
| Maximum clearance between supports | mm | 500 | 500 | 500 | 600 | 800 |
| Radius of punch tops | mm | 6,12 | 6,12 | 12, 16 | 16, 22 | 16, 22 |


